TOLERABLE TRAVEL PHOTOS - 10 easy steps to travel photography success.
by Louis BignamiToday's sophisticated cameras and forgiving films make good photographs easier to take than ever. Unfortunately, casual photographers often abdicate their responsibility and adopt a "let the camera take the photo" approach. Professionals know people make great photos; cameras only record what you see. So all you need is an adequate camera, appropriate film, minimal instruction and sufficient practice to insure a photo record of the important events in your life.
1. Cameras
Don't worry too much about cameras. Most take considerably better photographs than their operators. Buying a state-of-the art "everything adjustable" camera and leaving it on automatic won't add much to the results you get with "point-and-shoot." Then too, do you travel to take photographs, or photograph to remember your travels? In the usual last case snapshots can do the job. If you don't mind lugging one, a video camera's a good option, and digital still cameras are becoming less expensive every year. Still, film's still the choice.
Today's photographer most often uses Polaroid(r), 35mm cameras or even smaller format cameras. Polaroid(r) cameras let you see your shot immediately to avoid the "will it come out" worry all photographers face. So you can adjust exposure or composition and reshoot if you goof -- a good choice for travel photography if you do not mind the higher cost per print.
Small format cameras slip into pockets and purses. They work well if you do
not need sharp prints larger than snap-shots. Then too, any camera that's available
when you need it "right now" is better than a fancy outfit stashed in hotel room,
vehicle or even camera bag. That's the reason most pros use a wide strap to hang
ready cameras around their neck and use filters to protect lenses rather than lens
caps. 
Nice subject-to-background color contrasts make this photo.
PHOTO CREDIT: ANNETTE LUCIDO
Professionals use 35mm cameras, which offer the widest choice of films, lenses and features. Point and shoot 35mm cameras set film speed, focus and expose automatically to suit most situations. Pros often use these as backup. Cameras with manual overrides of automatic features let photographers adjust to special requirements. Interchangeable and/or zoom lens cameras are more flexible if you take the time to learn how to use them. Note: when all else fails read the instructions! Finally, shoot at least three rolls of film in new cameras before you take them on a trip!
2. Film
Most casual photographers shoot color print film such as Kodacolor. Color transparency (slide) film such as Kodachrome 64, the one-time choice of professional travel photographers, costs less per shot if you edit slides and print only the best. Ektachrome slide film offers higher speeds, but tends to be a bit blue when shot around snow or water.
Fuji, Agfa and other brands of print and transparency film differ slightly in color balance. So many photographers try a roll of each on one set of subjects and compare results before they select one brand.
Buy and shoot lots of film; it's the least expensive part of any trip. We figure two to three rolls a day. You can keep film, for while film deteriorates in the heat, it does not effectively age if refrigerated or frozen until needed. So pros buy film in quantity and store it until needed. After they shoot, they process film immediately. Buy processing envelopes, stamp them and you can mail film to processing as you go too.
3. ASA/Film Speed
Each film has an ASA rating set automatically or manually that tells the
camera how much light it needs. Higher ASA 200, 400, 800 or 1000 films suit low light
situations or rapidly moving subjects. Lower ASA 25, 64 or 100 films offer maximum
sharpness. Since ASA ratings are averages, experts shoot a test roll at slightly
different ratings. For example, expose one third of an ASA 64 roll at ASA 50, ASA 64,
ASA 800, then examine the results and set your own ASA. 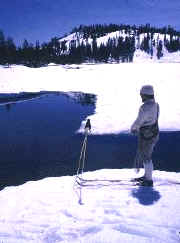
Limiting the number of colors increases impact. Meter reading taken off hand.
PHOTO CREDIT: ANNETTE LUCIDO
4. Exposing Exposure
Improper exposure is a major cause of poor photos. All exposure meters see both snow and coal as medium-gray. If your subject matter isn't, your exposure can be incorrect. This often happens when you shoot a portrait on a sunny beach or snow drift. One solution is to simply hold your hand in the same light and plane as your important subject matter; then use the meter reading off your hand to set the exposure of your shot. You can also simply set the suggested exposure for your conditions, which you'll find in your film box or container.
5. Forever Filters
Sky or UV filters improve photo results outdoors, but the best reason to use a filter is that scratched or broken filters cost much less than damaged lenses! So put UV filters on everything and use a polarizing filter if you shoot in the tropics or around snow, sand or water.
6. Lens Look
Standard lenses for 35mm range from 45mm to 55mm. Shorter lenses offer wide-angle results which suit tight quarters. Longer lenses from 70mm to 210mm pull in distant shots at the price of increased haze. Zoom lenses such as 28-90mm or 35--70mm ease photo composition; this is most important with transparency film.
7. Try Tripods
Camera shake is the second major cause of poor photos. A light finger on your shutter helps. Even a small tripod can steady your results as well as hold your camera with the self-timer going so you can be in the photograph too. If you must, brace an elbow on a wall or support.

Close-ups focus your attention on the important subject matter if you use a shallow depth of field.
PHOTO CREDIT: ANNETTE LUCIDO
8. Lists
Professional photographers use shooting lists of "must" shots on trips or at passage rites such as weddings. Variety adds interest. Mix shots that show the setting -- "establishing shots -- add "head and shoulders portraits" and close ups. Cameras work on end so shoot trees and people that way, and scenics horizontally. Tip: pros shoot about half vertical and half horizontal. Finally, make a shooting list before a trip and you can check off each shot as it is taken.
9. Pitch it Now
Toss out the rotten shots. When transparencies or prints come back from processing, professional throw unsuccessful shots into the waste basket. If you follow their lead and only show photographs that meet your standards, your status as a photographer immediately improves.
10. Final Exposure
Each of these points helps take better photos. Do read camera magazines and books, but realize only practice makes proficient. So take more photos close to home, enroll in a night school class or join a camera club. Most important of all, take a minimalist approach with subject, colors and background so the viewer must look at what you consider important. In photography, as elsewhere, we all earn our results. Most photographs are taken. Great photographs are made!